Instrument computer setup guide
The setup process for the instrument computers (ICC, RTC, AOC) is
automated (to the extent possible) by scripts in the setup/
folder of magao-x/MagAOX.
Unfortunately, not everything can be automated when real hardware is involved. To set up a new instrument computer, follow the steps below. Once the BIOS and OS are setup, you can run the provisioning scripts.
Once the hardware has been connected up, setup proceeds as follows.
Important note about reinstalls vs. fresh installs: At this point in the project, we are unlikely to have a completely fresh set of hardware and drives to set up. The below instructions were written under the assumption of a fresh install, so take care not to perform destructive actions like repartitioning on drives with data you want to keep. See Migrating data from an existing installation for examples of what those data might be.
OS Installation
The computers in MagAO-X run Rocky Linux or Fedora (KDE edition).
Workstations: If you are installing a workstation, go to https://fedoraproject.org/kde/download/ and download the live ISO for Intel/AMD systems, which includes the installer.
Rack computers: If you are installing one of the rack computers, go to https://rockylinux.org/download and download the appropriate minimal ISO (x86_64, version 9).
Burn it to a USB drive using Balena Etcher, or dd, or similar. Reboot, choosing to enter BIOS setup (F1 key when prompted), then use the arrow keys to switch over to the boot menu. Make your USB device the first-choice boot device. Use F10 to save and exit BIOS and boot. Choose to install Rocky Linux with the arrow keys and hit enter to select.
Workstations: Double-click the “Install to Hard Drive” icon at upper left.
Rack computers: The image will boot directly into the installer. The installer is graphical, so use the iKVM or a connected VGA monitor plus keyboard and mouse to continue.
At the prompt choose “English (United States)” as the language for the installer. After clicking “Continue” you’ll be at the Installation Summary page. Click on the following headings to make configuration changes before beginning installation:
Network & Hostname
In the box at lower left, fill in the machine name (i.e. exao1 for AOC, exao2 for RTC, exao3 for ICC). Configuring network adapters will happen after installation, once we change how the adapter names are selected.
Date & Time
Timezone: Etc/UTC
Partitions
See Migrating data from an existing installation if you’re migrating to a new OS or new drives because you’ll probably want to save files relevant to UID/GID maps, keys, tailscale, etc.
Select all disks
Select “I will configure partitioning”
On 2x 512 drives:
1 GiB
/boot- RAID 116 GiB swap - RAID 1
The rest as
/- RAID 1
On the data drives (should be 3 or more identical drives):
All space as
/data- RAID 5 only ICC/RTCAll space as
/home- RAID 5 only AOC
Begin the installation
Users
Set
rootpassword, choose toLock root accountso it cannot be used to log inCreate
xdevuser account (full name “MagAO-X Developer”, but xdev to friends) for use after reboot. Use the usual password. Check “Make this user administrator”.
Warning
The xdev (UID 1000) and xsup (UID 1001) accounts are special, because their IDs are kept in sync manually across instrument computers rather than using centralized authentication.
This gives us a backup option if we can no longer authenticate users over the internet.
Do not start creating user accounts until after you have set up LDAP authentication (see :doc:`../user_auth`).
After OS installation
Note: For AOC, multiple monitors seem to confuse the default NVIDIA drivers. Stick to the VGA output until the NVIDIA drivers are set up (see below).
Update
Log in as
rootRun
dnf update -y. You may also be prompted to accept some signing keys withy.Install a few essentials
dnf install -y git tmux vim nano curl
Check RAID status
Check RAID mirroring status: cat /proc/mdstat. On new installs, it
takes some time for the initial synchronization of the drives. (Like,
“leave it overnight” time.)
Configure network interface naming
SystemD and udev have conspired to implement something called “predictable network interface names” that could more accurately be called “unpredictable network interface names”.
Rocky 9 and Fedora 42:
The old way seems to have gone, but there are now “”SystemD Link Files”?
sudo mkdir -p /etc/systemd/network && sudo vim /etc/systemd/network/10-ethernet-mac-addr-names.linkEnter, for example:
[Match]
OriginalName=*

[Link]
NamePolicy=mac
Reboot and verify the existence of /dev/en<hex mac>
Configure network connections
Names for network interfaces are now tied to their hardware MAC address,
not their location on the PCI bus. The flip side is that replacing a NIC
with a new card will require repeating the below process, probably from
a seat at the computer. (However, this happens much less often than
rearranging GPUs and confusing NetworkManager with renumbered enXpY
devices.)
Use
ip aornmclito verify the new network names.Unplug the
instrumentand other interfaces and runnmcliagain, noting which of the interfaces shows up as connectedCopy the full name (
enxaabbccddeeff) of the interface that is showing up as connectedIn
sudo nmtui, rename or delete connections as necessary until there is onlywww-ua,www-lco, andinstrument(Note: ICC hasicc-to-rtcand RTC hasrtc-to-iccto configure, which are a pair of NICs for low-latency transfer. ICC additionally hascamsci1andcamsci2. Consult the Networking doc for their config.)Edit the
www-*connections to ensure the “Device” field is set to the interface name you just copiedCopy the full name for the instrument interface, plug its cable back in, and repeat the last step for the
instrumentconnectionActivate the appropriate connections in
nmtui(or withnmcli con down www-lco; nmcli con up www-ua; nmcli con up instrument, swapwww-uaandwww-lcoif necessary)Choose
Edit a connectioninnmtuiHighlight
instrumentand hitEnterUnder
IPv4 CONFIGURATIONensureNever use this network for default routeis checked with an[X]At the bottom of the list, ensure
Automatically connectandAvailable to all usersare checked
Highlight
www-uaand hitEnterUnder
IPv4 CONFIGURATIONensureNever use this network for default routeis not checkedAt the bottom of the list, ensure
Available to all usersis checkedEnsure
Automatically connectis checked, unless you are at the telescope
Highlight
www-lcoand hitEnterAt the bottom of the list, ensure
Automatically connectis not checked (unless you are at the telescope)
Trust connections internal to the instrument:
sudo nmcli con modify instrument connection.zone trustedVerify they are both active with the appropriate connection profile in
nmcli. Example from AOC:$ nmcli enx2cfda1c61ddf: connected to www-lco "Intel I210" ethernet (igb), 2C:FD:A1:C6:1D:DF, hw, mtu 1500 ip4 default inet4 200.28.147.221/24 route4 200.28.147.0/24 route4 0.0.0.0/0 inet6 fe80::f8dd:82f0:237d:a4f1/64 route6 fe80::/64 route6 ff00::/8 enx2cfda1c61dde: connected to instrument "Intel I210" ethernet (igb), 2C:FD:A1:C6:1D:DE, hw, mtu 1500 inet4 192.168.0.10/24 route4 192.168.0.0/24 inet6 fe80::e992:1899:f32c:95cf/64 route6 ff00::/8 route6 fe80::/64Verify that the internet is reachable from the instrument (e.g.
ping 8.8.8.8) and the new config works to ping the machine from outside
Configure VPN
See the Instrument Virtual Private Network section of the handbook for install instructions.
If this is a migration from an old install, you will need /var/lib/tailscale/tailscaled.state from the old machine. See Migrating data from an existing installation.
You should also trust the tailscale0 interface in the firewall:
sudo firewall-cmd --zone trusted --add-interface tailscale0 && sudo firewall-cmd --zone trusted --add-interface tailscale0 --permanent
Setup ssh
For setup, you should add your public key to the
/home/xdev/.ssh/authorized_keysfile, and make sure you can log in (asxdev) without being prompted for a password.Now configure
sshdto require key-based authentication. Do this by creating a file withsudo vim /etc/ssh/sshd_config.d/disable_password.conf:PasswordAuthentication no
And finally, reload the sshd
systemctl reload sshd
Configure /data array options (RTC and ICC only)
We should be able to boot with zero of the drives in the /data array
without systemd dropping to a recovery prompt.
Edit /etc/fstab, and on the line for /data replace defaults
with the options noauto,x-systemd.automount.
Setup network attached storage (NAS) (optional)
Follow the steps in Network Attached Storage to create the /srv/nas mount.
AOC only: GPU drivers setup
Since we actually use the AOC GPU for graphics (shockingly enough), you will need to install NVIDIA’s CUDA package with drivers before the monitors will work right. You’ll want ``ssh`` access in case anything goes wrong, so make sure it’s working!
Before starting, make sure everything’s up to date:
dnf update -yDownload CUDA 10.1 from https://developer.nvidia.com/compute/cuda/10.1/Prod/local_installers/cuda_10.1.168_418.67_linux.run (or whatever version is current in setup/steps/install_cuda.sh) and take note of where it is saved
Install prerequisites:
sudo dnf install -y kernel-devel kernel-headersAs root, edit the line in
/etc/default/grubthat readsGRUB_CMDLINE_LINUX="[parts omitted] rhgb quiet"
to read
GRUB_CMDLINE_LINUX="[parts omitted] rhgb quiet rd.driver.blacklist=nouveau nouveau.modeset=0"
Install the new grub config with
sudo grub2-mkconfig -o /boot/grub2/grub.cfgCreate /etc/modprobe.d/blacklist-nouveau.conf with the contents
blacklist nouveau
options nouveau modeset=0
Execute
sudo systemctl set-default multi-user.targetShut down
Disconnect all monitors from the NVIDIA card
Connect a monitor to the VGA port from the motherboard’s onboard graphics
Reboot to a text-mode prompt
Log in as
rootRun CUDA installer with
bash cuda_10.1.168_418.67_linux.run --silent --driver --toolkit --samples(or whatever version is downloaded)Default to graphical boot:
systemctl set-default graphical.targetShut down
Disconnect the VGA port, reconnect the battle station monitors
Open up System Settings -> Display & Monitor and arrange the monitor geometry to reflect reality
Edit
/etc/default/grubto removerd.driver.blacklist=nouveau nouveau.modeset=0fromGRUB_CMDLINE_LINUXand rungrub2-mkconfig -o /boot/grub2/grub.cfgOnce everything’s working satisfactorily, we want to lock the kernel version (so that we don’t end up accidentally removing graphical boot capabilities with a
dnf update -y):sudo dnf install -y dnf-versionlocksudo dnf versionlock kernel kernel-headers kernel-devel
Perform (mostly) automated provisioning
Log in via ssh as xdev.
Clone magao-x/magao-x-setup into your home directory (not into
/opt/MagAOX, yet)$ cd $ git clone https://github.com/magao-x/magao-x-setup.git
Switch to the
magao-x-setupdirectory you just cloned (i.e.cd ~/magao-x-setup) to perform pre-provisioning steps (i.e. steps requiring a reboot to take effect)$ cd ~/magao-x-setup/ $ ./pre_provision.sh
This sets up an
xsupuser and themagaoxandmagaox-devgroups. Because this step adds whoever ran it tomagaox-dev, you will have to log out and back in.On ICC and RTC, this step updates the kernel command line for ALPAO compatibility reasons. It also adds settings to disable the open-source
nouveaudrivers for the NVIDIA card. (This is so that the CUDA install proceeds without errors.) You must reboot before continuing.Reboot, verify groups
$ sudo reboot
[log in again]
$ groups
xdev magaox-dev ...
Install
tmuxfor conveniencetmuxallows you to preserve a running session across ssh disconnection and reconnection. (Ten second tutorial: Runningtmuxwith no arguments starts a new self-contained session.Ctrl-bfollowed byddetatches from it, while any scripts you started continue to run. Thetmux attachcommand reattaches.)$ sudo dnf install -y tmux
(It’s used by the system, so it’ll get installed anyway, but you might want it when you run the install.)
To start a new session for the installation:
$ tmux
RTC/ICC only: Obtain proprietary / non-redistributable software from the team Box folder
Go to MagAO-X/vendor_software/ (invite required), click the “…” on
bundleand choose “Download”. Savebundle.zipinMagAOX/setup/next toprovision.sh.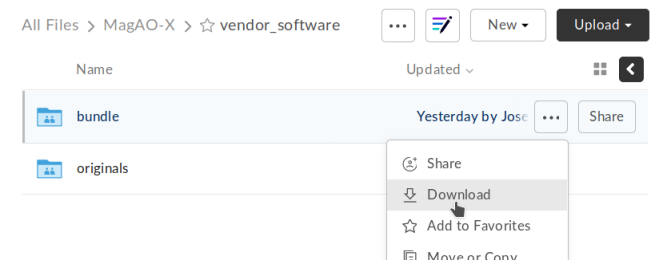
Screenshot of Box interface to download bundle
This bundle includes software for the Andor, ALPAO, and Boston Micromachines hardware.
Run the provisioning script as
xdev$ cd /opt/MagAOX/source/MagAOX/setup $ bash ./provision.sh
If you installed and invoked
tmuxin the previous step, this would be a good time toCtrl-b+dand go get a coffee.
Successful provisioning will end with the message “Finished!” and installed copies of MagAOX and its dependencies.
A lot of the things this script installs need environment variables set,
so source /etc/profile.d/*.sh to keep working in the same terminal
(or just log in again).
Perform xsup key management
A new installation will generate new SSH keys for xsup.
If you have
an existing .ssh folder for the machine role (ICC, RTC, AOC) you’re
setting up, you can just copy its contents over the new
/home/xsup/.ssh/ (taking care not to change permissions). See Migrating data from an existing installation.
If not, you must ensure passwordless SSH works bidirectionally by
installing other servers’ xsup keys and installing your own in their
/home/xsup/.ssh/authorized_keys.
In the guide below, $NEW_ROLE is the role we just set up and
$OTHER_ROLE is each of the other roles in turn. (For example, if we
just set up the RTC, $NEW_ROLE == RTC and $OTHER_ROLE would be
ICC and AOC.)
Step-by-step
For each of the $OTHER_ROLEs:
On
$NEW_ROLE, copy/home/xsup/.ssh/id_ed25519.pubto the clipboardConnect to
$OTHER_ROLEwith your normal user account over SSHBecome
xsupon$OTHER_ROLEand edit/home/xsup/.ssh/authorized_keysto insert the one you copiedOn
$OTHER_ROLE, copy/home/xsup/.ssh/id_ed25519.pubto the clipboardBack on
$NEW_ROLE, append the key you just copied to/home/xsup/.ssh/authorized_keysOn
$NEW_ROLE, test you canssh $OTHER_ROLEasxsup(potentially amending~/.ssh/known_hosts)On
$OTHER_ROLE, test you canssh $NEW_ROLEasxsup(potentially amending~/.ssh/known_hosts)
Verify bootloader installation / RAID correctness
Ensure RAID arrays are fully built with
cat /proc/mdstatshutdownPop one of the two boot drives from the SSD cage
Boot, verify that 1)
grubappears and 2) the OS comes up (after a longer boot delay)Replace that boot drive, reboot
Ensure RAID arrays are fully rebuilt with
cat /proc/mdstatPop the other drive
Repeat verification steps
Replace boot drive
Boot with both in place
Shutdown, pop all data drives
Ensure boot proceeds without dropping to recovery prompt
Replace all data drives, boot with everything in place
Enable all sensors
To make sure all temperature, fan, and voltage sensors are being reported to
lm_sensors, you must scan the motherboard to install the necessary drivers.
This is accomplished with:
$ sudo sensors-detect
Hit enter to accept defaults (YES for low risk, NO for NVIDIA i2c and others)
when prompted. At the end, you’ll get output like this:
Do you want to overwrite /etc/sysconfig/lm_sensors? (YES/no):
To load everything that is needed, add this to one of the system
initialization scripts (e.g. /etc/rc.d/rc.local):

#----cut here----
# Chip drivers
modprobe nct6775
/usr/bin/sensors -s
#----cut here----

You really should try these commands right now to make sure everything
is working properly. Monitoring programs won't work until the needed
modules are loaded.
Well, /etc/rc.d/rc.local doesn’t exist on our Linux versions. If there are
any modprobe lines in the output, you can add the module names
to /etc/modules-load.d like this:
echo nct6775 | sudo tee /etc/modules-load.d/nct6775.conf
And load the module on the running system with (as it suggests) modprobe nct6775.
Afterwards, check the sensors readout shows voltages, temperatures, and fan RPMs with:
$ sensors
Next steps
Continue with setting up user authentication with network accounts: New computer setup